What Are the Steps of the Engineering Design Process? Posters for Every Grade Band

Every hands-on build in a K-12 classroom follows the same loop, whether the students are stacking popsicle-stick bridges or programming a competition robot. The fastest way to keep them moving through that loop is to put it on the wall. Here's the five-step engineering design process explained, how the poster should change from kindergarten to a high school robotics lab, and how to print an NGSS-aligned version sized for your room.
The whole process, in one paragraph
The engineering design process most commonly taught in K-12 classrooms has five steps: Ask (define the problem), Imagine (brainstorm solutions), Plan (choose one and sketch it), Create (build a prototype), and Improve (test it and go back around the loop). Some programs teach it with more steps — our elementary engineering guide covers a research-based 7-step version — but they all cycle through the same core idea. A poster beats a handout because students can reference a wall display at a glance mid-build without hunting through a folder, and StudioCore's curriculum AI can generate a grade-appropriate, NGSS-aligned version sized for your room in one prompt.
Wait — Is It 5 Steps or 7?
Both, depending on the program. The 5-step version below (Ask, Imagine, Plan, Create, Improve) is the most widely taught K-12 model and the easiest to fit on a single wall poster. Some STEM curricula, including a NASA-derived framework, break the same loop into 7 steps for more procedural detail — we cover that research-backed version, with classroom display data, in the separate elementary engineering display guide.
Either is correct. Pick the one your standards or curriculum already uses, and keep the poster consistent with it all year — the confusion starts when the wall says one thing and the project rubric says another.
The 5 Steps of the Engineering Design Process
Five stations, one circuit. Students enter at Ask and keep circling until the design works — which is exactly why the wall version is drawn as a loop, not a numbered list.
Ask
What's the problem? What are the constraints and requirements? Define it clearly before jumping to solutions.
Imagine
Brainstorm as many possible solutions as possible, without judging them yet. More ideas, better final pick.
Plan
Choose the strongest idea, sketch it, and list the materials and steps needed to build it.
Create
Build a prototype. It doesn't need to be perfect — it needs to exist so it can be tested.
Improve
Test it, see what failed, and loop back to Ask or Imagine. The process is a cycle, not a line.
↺ STEP 05 FEEDS BACK INTO STEP 01 — IT'S A CYCLE, NOT A CHECKLIST
Why a K-2 Poster and a High School Poster Shouldn't Match
The same five steps work at every grade level, but the poster that explains them shouldn't look identical from kindergarten to senior year. What changes is density and vocabulary, not the underlying loop.
Elementary: Icon-First
Large, bold icons with minimal text — a lightbulb for Imagine, a wrench for Improve. Young students recognize the icon faster than they read the word, so the poster works as a visual anchor even for emerging readers.
Middle School: Process-Focused
The same five stations, with room for a short prompt or sentence starter at each step — useful for science-fair or CTE project logs where students document their own process in writing. When a Mars-rover build stalls at the testing table, the wall tells the team exactly which station to go back to.
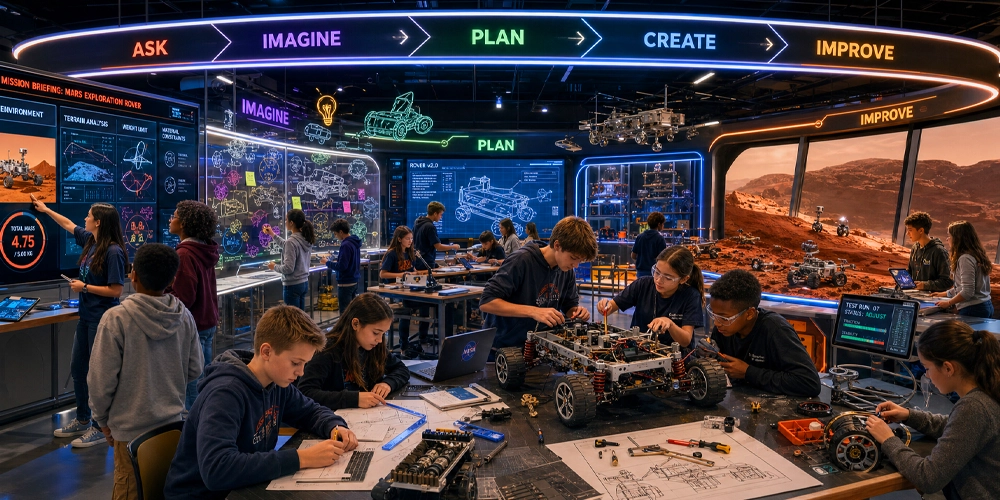
FIG. 6-8 // Process poster in use during a middle school Mars rover project
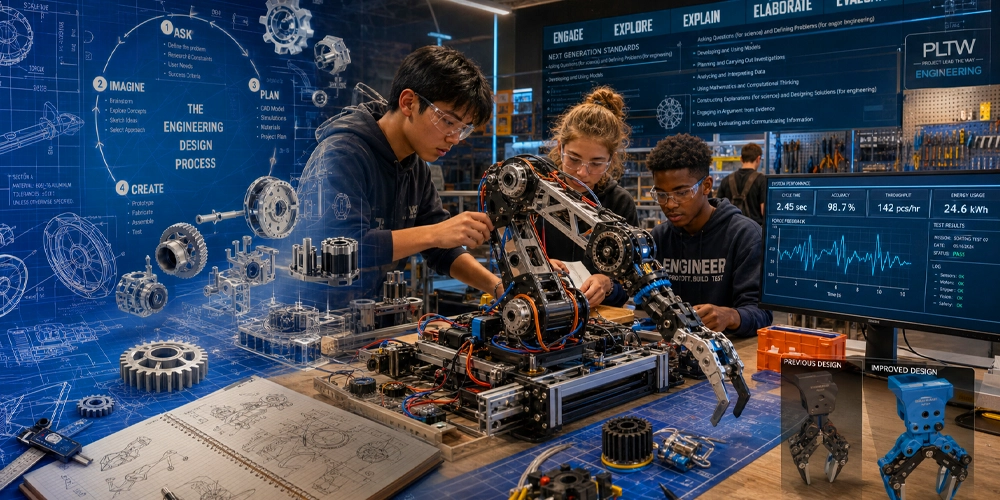
FIG. 9-12 // Standards-referenced process wall in a high school robotics lab
High School: Standards-Referenced
A more detailed version that can reference the specific engineering standard being addressed — useful in an engineering, physics, or CTE pathway classroom where the process ties directly to a graded rubric. In a robotics lab, the loop stops being decoration and becomes the team's debugging protocol.
The rule-of-thumb size for a single classroom-wall engineering design process poster — legible from student desks in most rooms.
The step up for a shared hallway, makerspace, or STEM lab display, so the icons stay legible from across the room.
NGSS Alignment & Printable Templates
Rather than one generic poster for the whole school, StudioCore — the education design platform Poster Studio Express offers with its poster maker packages — can generate a version matched to the exact grade and standard a classroom needs.
MODULE 01Curriculum-Trained AI
Trained on NGSS along with Common Core, TEKS, B.E.S.T., Virginia SOL and more — 100,000+ standards indexed. Ask for an NGSS-aligned engineering design process poster and it drafts one matched to grade-level vocabulary and complexity.
MODULE 02Design Library
10,000+ standards-aligned templates as a starting point, fully editable in the Design-a-Poster editor.
MODULE 03140+ Smart Tools
Build process diagrams, equation solvers and other STEM visuals that assemble themselves from typed content.
MODULE 04Teacher Approval Required
Nothing the AI generates ever prints without a teacher reviewing and approving it first.
Choosing Your Classroom EDP Poster
Three ways to get the loop on the wall, depending on how custom it needs to be.
| Design Library Template | AI-Generated Custom | Build with Smart Tools | |
|---|---|---|---|
| Speed | Fastest — pick and print | One prompt, a few minutes | Minutes, fully custom |
| Customization | Colors, text swap | Grade level, wording, subject | Full control of layout & content |
| Standards match | General alignment | Matched to the specific standard you name | Depends what you build in |
| Best for | A quick, reliable default | A specific NGSS or unit tie-in | A teacher-designed process wall |
Start with a Design Library template
A ready-made process poster gets a wall display up before the unit even starts.
Generate one with the AI
Name the standard and grade level; get a matched, editable draft in minutes.
Build your own with Smart Tools
Worth the extra control once the process wall becomes a permanent fixture.
STEM & CTE Wall Displays Often Qualify for Existing Budget Lines
Engineering and CTE program materials, including classroom display posters, commonly fall under Carl Perkins V and Title IV-A funding on eligible campuses and uses — the same budget lines many schools already tap for STEM lab equipment. Every Poster Studio Express quote includes a funding-justification letter, so a process-poster order can ride along with a larger STEM or CTE equipment purchase instead of needing its own line item. See the full list of funding paths on the funding sources page.
Print a Grade-Banded Process Poster
Request a free live demo or a same-day quote — Poster Studio Express offers packages with StudioCore's curriculum-trained AI, Design Library, and Smart Tools.
Frequently Asked Questions
What are the steps of the engineering design process?
The most common K-12 version has five steps: Ask (define the problem), Imagine (brainstorm solutions), Plan (choose one and sketch it), Create (build a prototype), and Improve (test it and loop back). Some curricula, including a NASA-derived framework, teach a 7-step version of the same core cycle.
What is an engineering design process poster?
A wall display that shows the engineering design process as a visual, usually circular, diagram rather than a text list — students reference it while working through a project instead of hunting for a handout. Grade-banded versions adjust the icon density and the amount of text to match the age group.
What size should a classroom engineering design process poster be?
24×36 inches works well for a single classroom wall. A shared hallway, makerspace, or STEM lab display benefits from a larger 36×48 inch size so the icons and steps stay legible from across the room.
Are there NGSS-aligned engineering design process posters?
Yes. StudioCore's curriculum-trained AI is trained on NGSS along with Common Core, TEKS, B.E.S.T., Virginia SOL, and other state frameworks — more than 100,000 standards indexed — so asking it for an NGSS-aligned engineering design process poster produces an editable, grade-matched draft. Nothing prints without a teacher reviewing and approving it first.
Whether your school teaches a 5-step or 7-step version of the engineering design process, the poster works the same way: a visual anchor students actually use while they're stuck mid-project, sized and worded for the grade band in the room. For the research-backed 7-step display strategy, see the elementary engineering guide; for more STEM wall ideas, browse Transforming Classrooms with STEM Posters or the STEAM walls guide.
Written by Dr. Maya Richardson, District Director of Curriculum & Instruction, for Poster Studio Express.
LAST UPDATED: